Drill Press Swing vs. Spindle Travel: Capacity Guide
Quick answer
Swing measures twice the horizontal distance from the spindle centerline to the column, while spindle or quill travel measures how far the spindle can move downward. Check both, then subtract the bit, stock, backing board, and fixture from chuck-to-table clearance before deciding that a project fits.
Common questions
- What does drill press swing mean?
- Swing is twice the horizontal distance from the spindle centerline to the nearest face of the column. A 12-inch drill press therefore has about 6 inches of throat reach and can nominally reach the center of a 12-inch round workpiece.
- Is spindle travel the same as drilling depth?
- Not exactly. Spindle or quill travel is the machine's maximum downward stroke. Usable drilling depth can be less because the bit must remain securely held, chips need room to clear, and the depth stop and work setup may limit the stroke.
- Does a larger drill press swing mean more power?
- No. Swing describes horizontal reach, not motor power, torque, speed range, chuck capacity, or drilling depth. Compare those specifications separately for the bits and materials you plan to use.
Source note: Capacity definitions, example specifications, and safety guidance were checked against current WEN, Powermatic, and OSHA materials on August 26, 2026. Verify the manual and measured clearances for your exact machine before setup.
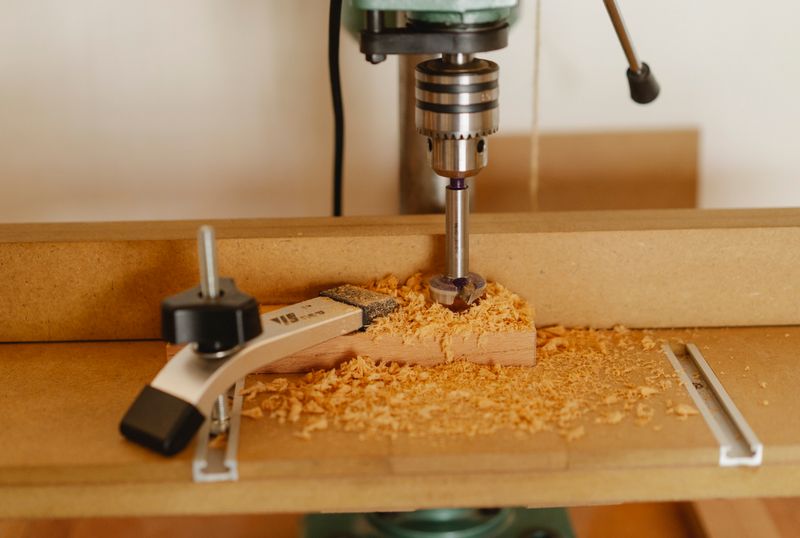
A drill press can look large enough and still miss the hole center or leave too little room for the bit and clamps. Compare three dimensions: horizontal reach, spindle travel, and vertical setup clearance.
If you are still comparing complete machines, start with our drill press buying guide. Use this capacity guide when you need to prove that a specific project and fixture will actually fit.
Capacity does not prove condition. If a bit or chuck traces a circle, follow the drill press wobble and runout diagnostic before changing parts or judging the machine by a finished hole.
Drill press capacity at a glance
| Specification | Direction measured | What it tells you | What it does not tell you |
|---|---|---|---|
| Swing | Horizontal | Maximum nominal workpiece diameter whose center the bit can reach | Power or hole depth |
| Throat depth | Horizontal | Spindle-centerline-to-column distance; usually half the swing | Clear table area |
| Spindle or quill travel | Vertical movement | Maximum downward stroke in one setup | Total space below the chuck |
| Chuck-to-table distance | Vertical opening | Room for the bit, stock, backing board, and fixture | Whether the hole is within throat reach |
| Table movement | Around and along the column | How the table can be positioned and locked | Permission to use unsupported or side-loaded setups |
The shortest answer: swing controls how far inward you can drill; spindle travel controls how far downward the spindle can move.
Annotated drill press spec decoder
1. Swing and throat depth control reach
Manufacturers usually define swing as twice the distance from the spindle centerline to the front of the column. That makes the basic conversion:
Nominal throat reach = listed swing ÷ 2
A 12-inch drill press therefore has about 6 inches of throat depth. It can nominally reach a hole no more than 6 inches from an edge that can face the column.
For rectangular work, measure from the hole center to the nearest edge you can actually present to the column. A hole 7 inches from one edge and 4 inches from another needs only 4 inches of reach if the work can be rotated and safely supported.
Swing is not horsepower, torque, accuracy, or drilling depth. A fence, clamp, guard, or irregular workpiece may further reduce usable reach.
2. Spindle travel controls one-plunge depth
Spindle travel, often called quill travel or stroke, is the maximum distance the spindle moves down when you pull the feed handle. A depth stop can limit that movement for repeat holes, but it cannot extend it.
Treat the listed travel as a ceiling. Allow for secure bit engagement, chip clearing, a brad-point spur, or the uncut tip of a Forstner bit.
Do not confuse travel with reach. A machine can have a generous 6-inch stroke and still be unable to reach a hole 10 inches in from a panel edge.
3. Chuck-to-table clearance controls the stack
Chuck-to-table distance is the largest opening between the bottom of the chuck and the table at its lowest usable position. WEN notes that this figure estimates workpiece height but does not include bit length.
Use this conservative fit test:
Required opening = exposed bit length + stock height + backing board + fixture height + setup margin
The required opening must be less than the machine’s available chuck-to-table distance. Measure the actual setup when possible because auxiliary tables, vises, fences, clamps, and guards all consume space.
Some manuals also list chuck-to-base distance. Only move the table aside when the manufacturer permits the setup and the part can be rigidly supported and clamped.
4. Table movement and workholding decide whether it is usable
A table may raise, lower, tilt, or rotate. These movements help position work but do not increase throat depth. An auxiliary table improves support while consuming vertical clearance.
Plan the fence, stops, clamps, and backing board before counting a capacity as usable. The marking and measuring tools guide can help you transfer the same reference edge and hole center to every part.
5. Power, speed, and chuck size are separate checks
After the work fits, confirm chuck capacity and an appropriate speed for the bit and material. A larger swing does not automatically supply the low speed or torque needed for a large Forstner bit. Follow the exact machine and bit manuals.
Project-to-capacity worksheet
Record these project measurements before shopping or changing a setup:
| Worksheet item | Your measurement |
|---|---|
| A. Hole center to nearest usable workpiece edge | ___ in. |
| B. Required hole depth or through-stock thickness | ___ in. |
| C. Stock height on the table | ___ in. |
| D. Backing board thickness | ___ in. |
| E. Vise, jig, or auxiliary-table height | ___ in. |
| F. Bit length exposed below the chuck | ___ in. |
| G. Practical setup margin | ___ in. |
Copy the machine’s swing, spindle travel, chuck-to-table distance, table size, and approved speed range from its current manual.
The setup passes only when all three calculations work:
- Reach: A ≤ swing ÷ 2.
- Stroke: B ≤ spindle travel, with allowance for the cutter tip and chip clearing.
- Opening: C + D + E + F + G ≤ chuck-to-table distance.
Confirm the table and surrounding supports can carry the work and provide usable clamping points. If a test fails, change the approved fixture or tool; never leave stock unsupported to force clearance.
Worked examples using current manufacturer specs
Example 1: Cabinet rail on a 12-inch benchtop press
WEN lists its current 4214T with a 12-inch swing and 3-1/8-inch spindle travel. That converts to about 6 inches of nominal throat reach.
Suppose a cabinet rail needs a 2-inch-deep hole whose center is 4 inches from the nearest usable edge:
- Reach test: 4 ≤ 6 inches — pass.
- Stroke test: 2 ≤ 3-1/8 inches — nominal pass.
- Opening test: still requires the actual bit, rail, backing board, clamp, and table position.
Swing and stroke cannot settle the decision alone; add the complete setup stack.
Example 2: Deep drilling on an 18-inch floor press
Powermatic currently lists the PM2800B with an 18-inch swing, 6 inches of spindle travel, and 22-3/8 inches from chuck to table. Its nominal throat reach is 9 inches.
For a hole 8 inches from the nearest usable edge and 4 inches deep, reach and stroke both pass on paper. If the exposed bit, stock, backer, fixture, and margin total 13 inches, the opening test also fits within 22-3/8 inches.
That is a capacity result, not an operating instruction. Bit type, speed, chip clearing, clamping, and the manual still control the setup.
Example 3: Center hole in a 24-inch panel
The panel center is 12 inches from every edge. It exceeds both the WEN’s 6-inch throat and the Powermatic’s 9-inch throat, regardless of their spindle travel.
Do not hang the panel precariously, side-load the chuck, or improvise milling motions. Use a suitable approved machine or a portable drilling method with a well-supported guide. Plan large-workpiece support as part of your workbench design, not as an afterthought at the drill press.
Safety limits are part of capacity
OSHA identifies hand-held stock as a common drill-press accident source because a catching bit can turn the work into an uncontrolled rotating object. It recommends a hold-down fixture whenever possible.
- Clamp the work and support long or oversized stock on both sides.
- Remove the chuck key and adjustment tools before starting.
- Use the correct speed, guards, and operating procedure from the machine and bit manuals.
- Stop the machine before adjusting the table, fence, belt, clamp, or workpiece.
- Keep hands away from the rotating chuck and clear chips only after rotation stops.
- Do not use a drill press for side-loading, routing, or milling unless the manufacturer explicitly designed and approved the exact machine and setup for it.
If square mortises are the real goal, compare a mortiser vs. drill press rather than treating an ordinary chuck and spindle as a milling system.
Sources and scope
Specifications and definitions were checked against these current primary sources:
- WEN drill press measurement FAQ
- WEN 4214T product specifications
- Powermatic PM2800B product specifications and manual
- OSHA drill press hazard and safeguarding guidance
Models change. This article does not replace the current manual for your serial-number range.
Next step: audit one real project
Choose the widest, deepest, or tallest drill-press operation you expect to perform this year. Complete the worksheet with the actual bit and fixture, then compare the result with the manual for the machine you own or are considering.
If reach, stroke, opening, support, and workholding all pass, move on to speed and power. If one fails, revise the approved method before spending money or bringing the work to the machine. The workshop storage and organization guide can help you reserve safe setup and outfeed space around the final choice.

The Carpenter's Guide Editorial Team
Independent trade-focused editorial team